High key & low key photography
(Unit Content 2)
In this post I'm going to talk about what high key & low key photography is and how they create different effects. Also, I'll go over the light and camera settings and the equipments. So after reading through this post you shall know that how you can create nice and good images in high & low key.
High and low key photography are two effects in the photography world. Basically, these type of photographs either use extremely high levels of white or black. Both high key and low key images make an intensive use of contrast, but in very different way. This intensive contrast that both lighting create by using different lightings and different backgrounds help you to isolate your subject and make the viewers focus on your subject.
So... How the light can change the effect/the feel of an image?
High and low key lighting are typical examples of how a photographer can use lights to influence the viewers' emotions and perception of the subject mood.

Let's start with...
HIGH KEY

Lighting Equipment
The best way to produce high key images is to use flash lights.
* 3 or 4 flash lights * Soft boxes * Lamp stands * White background * Reflector
Lighting Setup
As you already know what equipments you need to use to create a high key image, now let's think about the setup. The image below, shows you a basic and the most popular setup for high key. With this method you can achieve the effect of the bright and shadow less lighting. Use 4 lights to produce a high key image, but don't worry if you have only 3 lights you can still achieve it.
Just to know that before I'll start explaining the diagram, the high key lighting is not always producing the high key effect, because it somehow can be lost if your model/subject consists lots of mid or dark tones.

First, position your subject in the center of the white backdrop. Next, setup two lights on your subject (45°) with soft boxes. The one on the right will be your key light and that's your main source of light on the subject. The one on the left will be your fill light which will eliminate the harsh shadows that the key light produces. Finally, set up two other lights in angle with soft boxes, facing at/lighting up the background. The back lights should be more powerful than the front lights. (Note: If you're only shooting with the two front lights, you will get a gray, shadow filled background. An image with a gray background and with lots of mid tones called Mid key photography.)
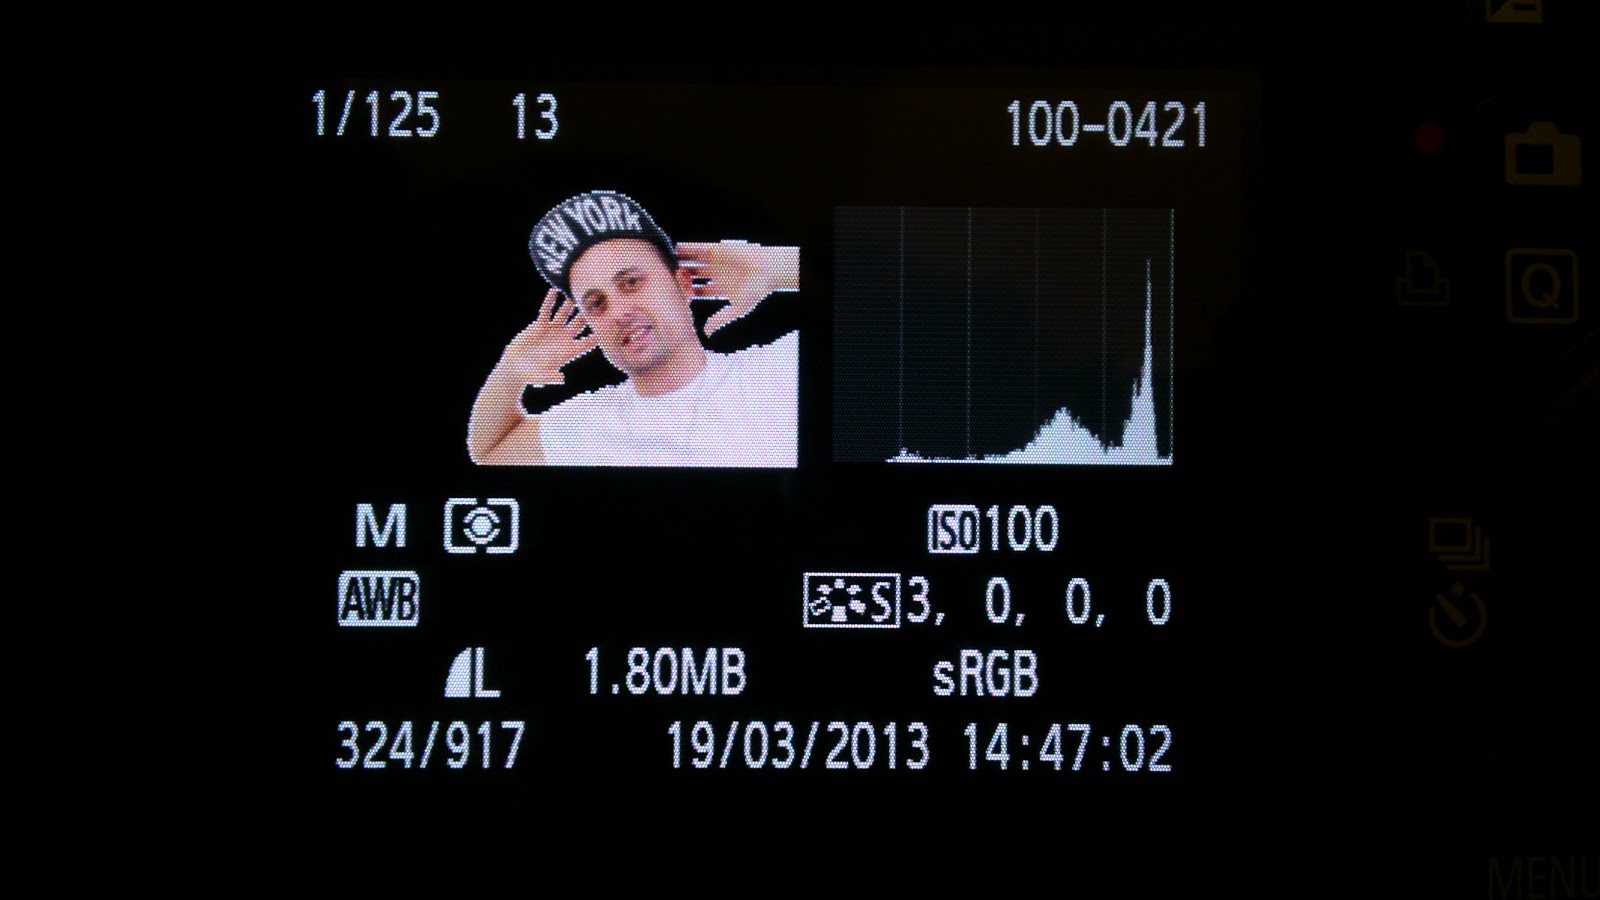
In addition, there is a function in your camera that could help you in setting up the power of your lights and to get the correct camera settings. So after setting up the studio, take a test shoot then go to play images and press display twice (if you've got a Canon). You will see the actual image in a smaller format and the histogram of your image next to it. If you see that your screen is flashing in black at some point on the image that means those areas are totally white (bleached out/no details). So, if you can reached that to have all or most of your background flashing in black then you'll have the correct lighting set up. Try to avoid black flashing on your subject and watch out to don't over expose the image.


What is high key photography?
High key photography is achieved by using lots of lighting. It seeks to eliminate harsh shadows and create bright environments. Overall, the images are very bright and contains lots of light tones and highlights with few mid tones and dark areas. No harsh shadows, the contrast is fairly low and usually the images have pure white (bleached out) background. It's generally used to convey happy, fun and beauty. High key (& low key) regularly used for model and for product photography.
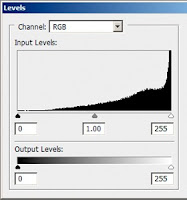
Here is an example of a histogram for a high key image.
Here is an example of a histogram for a high key image.

Lighting Equipment
The best way to produce high key images is to use flash lights.
* 3 or 4 flash lights * Soft boxes * Lamp stands * White background * Reflector
Lighting Setup
As you already know what equipments you need to use to create a high key image, now let's think about the setup. The image below, shows you a basic and the most popular setup for high key. With this method you can achieve the effect of the bright and shadow less lighting. Use 4 lights to produce a high key image, but don't worry if you have only 3 lights you can still achieve it.
Just to know that before I'll start explaining the diagram, the high key lighting is not always producing the high key effect, because it somehow can be lost if your model/subject consists lots of mid or dark tones.

First, position your subject in the center of the white backdrop. Next, setup two lights on your subject (45°) with soft boxes. The one on the right will be your key light and that's your main source of light on the subject. The one on the left will be your fill light which will eliminate the harsh shadows that the key light produces. Finally, set up two other lights in angle with soft boxes, facing at/lighting up the background. The back lights should be more powerful than the front lights. (Note: If you're only shooting with the two front lights, you will get a gray, shadow filled background. An image with a gray background and with lots of mid tones called Mid key photography.)
In addition, there is a function in your camera that could help you in setting up the power of your lights and to get the correct camera settings. So after setting up the studio, take a test shoot then go to play images and press display twice (if you've got a Canon). You will see the actual image in a smaller format and the histogram of your image next to it. If you see that your screen is flashing in black at some point on the image that means those areas are totally white (bleached out/no details). So, if you can reached that to have all or most of your background flashing in black then you'll have the correct lighting set up. Try to avoid black flashing on your subject and watch out to don't over expose the image.


<-- wrong -->


-- right -->
Camera Settings

-- right -->
Camera Settings
The camera settings are really depend on the lighting condition, but in studio I always start off with...
ISO 100 S/Tv 1/125th F 8.0
...because it's a good starting point and if it's necessary I could always change the settings after I took some test shots. For high key try to adjust your camera right so that can let in lots of light. So leave the ISO at 100 because you're going to use 4 lights that produce lots of light. The 1/125th shutter speed is a good speed for portraits and long enough to let in light, then you just have to play with your f-stop to get the right exposure.
Let's talk about...
What is low key photography?
Low key photography is achieved by using reduced lighting. So the key here is to produce a dark image AND to use lighting in a very selective way so that only illuminates a specific portion of the image. As low key uses less lighting, the images have high contrast and they contain lots of dark tones and colors. The intense shadows become the primary element of the composition. These low key images convey a sense of drama or tension to the image. Overall, low key photography is a simple technique to create moody images and if you're doing portraits, the low key settings could allow you to show the texture of the skin.
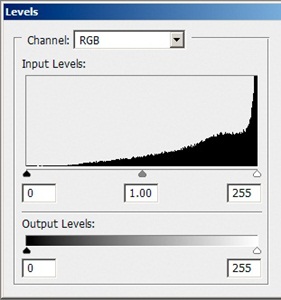
Here is an example of a histogram for a low key image.


Studio set up
There are lots of ways to setup low key shots. First, make sure you have a seamless black background. The choice of light is up to you but make sure you avoid any light spillage onto the background. Also position your subject a bit away from the backdrop. These two things could help you to get a nice and totally black background because the camera won't pick up any detail from the back.
Here is a simple setup for low key.


On this diagram you can see that there is only one flash light on the right (45°). Make sure the power of the flash is turned down so it does not blow out your subject too much.
If you want to give some nice hair light or provide little back lighting try this setup..


The trick to get that kind of look you want is to manipulating your lighting and positioning your subject, so the shadows fall in the right spots. Just play around with different angle of lighting, modifiers (snoot,soft box,barn doors, etc.) and different intensities of flash to see their effects.
Camera settings
For low key shots, you can have variety of the camera settings. You'll have to play with the exposure and aperture to achieve the best effect for your particular lighting setup. The trick here is to minimize the light entering the camera while not making everything too dark. So, leave the ISO at 100 which keeps the image quality and avoid noise. Shutter speed 1/125th is a good speed for portraits.
TO SUM UP..
I did a little comparison diagram.

Let's talk about...
LOW KEY
What is low key photography?
Low key photography is achieved by using reduced lighting. So the key here is to produce a dark image AND to use lighting in a very selective way so that only illuminates a specific portion of the image. As low key uses less lighting, the images have high contrast and they contain lots of dark tones and colors. The intense shadows become the primary element of the composition. These low key images convey a sense of drama or tension to the image. Overall, low key photography is a simple technique to create moody images and if you're doing portraits, the low key settings could allow you to show the texture of the skin.
Here is an example of a histogram for a low key image.


Studio set up
There are lots of ways to setup low key shots. First, make sure you have a seamless black background. The choice of light is up to you but make sure you avoid any light spillage onto the background. Also position your subject a bit away from the backdrop. These two things could help you to get a nice and totally black background because the camera won't pick up any detail from the back.
Here is a simple setup for low key.


On this diagram you can see that there is only one flash light on the right (45°). Make sure the power of the flash is turned down so it does not blow out your subject too much.
If you want to give some nice hair light or provide little back lighting try this setup..


The trick to get that kind of look you want is to manipulating your lighting and positioning your subject, so the shadows fall in the right spots. Just play around with different angle of lighting, modifiers (snoot,soft box,barn doors, etc.) and different intensities of flash to see their effects.
Camera settings
For low key shots, you can have variety of the camera settings. You'll have to play with the exposure and aperture to achieve the best effect for your particular lighting setup. The trick here is to minimize the light entering the camera while not making everything too dark. So, leave the ISO at 100 which keeps the image quality and avoid noise. Shutter speed 1/125th is a good speed for portraits.
TO SUM UP..
I did a little comparison diagram.
No comments:
Post a Comment